“Hey… you know that plant of ours in Europe… the one with all of the downtime?”
“Sure… “
“Did you know it runs on a 30-year old VAX that we’re sourcing parts for off of Ebay?”
“Really?! … I guess that makes 4 plants that I know of in the exact same situation!”
That conversation, or one very much like it is the same conversation being had at thousands publicly traded companies, and government organizations around the world. If you’re a syadmin, a VMware resource, or a developer who got their start anytime in the x86 era, you’ll be forgiven if the closest you’ve come to hardware from Digital Equipment Corp (DEC)/HP Alpha is maybe Alpha/NT box somewhere along the line. You’d also be forgiven for assuming that VAX hardware from the 1970’s doesn’t still run manufacturing lines that produce millions of dollars in products a year.
But that’s exactly what’s happening.
… And so is the Ebay part of the equation.
To hear the Alpha folks talk, those old platforms were bulletproof and would run forever. Perhaps not in exactly the same way that the large swaths of the banking industry still run on COBOL, but it’s an apt comparison. The biggest difference is that code doesn’t literally rust away. The DEC/HP Alpha hardware is engineered to something like Apollo-era reliability standards… but while they stopped flying Saturn V’s 40 years ago, these VAX machines are still churning away. Anyway, there’s a joke that goes something like… you know how some syadmins used to like to brag about our *nix system uptimes being measured in years (before heartbleed and shellshock)?
Well, VAX folks brag about uptimes measured in decades.
Crazy, isn’t it?
You might be sitting there asking yourself how we got to this situation? In simple business terms… If it ain’t broke (and you can’t make any extra margin by fixing it), don’t fix it!
I know lots of IT folks have this tendency to think in 1-3 year time-spans. I get it. We like technology, the latest gadgets, and sometimes have an unfortunate tendency argue about technica-obsecura. But that’s only really because “Technology moves so fast”, right? Yes, there’s Moore’s law, and the Cloud, and mobility, and all of that stuff. Yes, technology does move fast. But business… business doesn’t really care about how fast technology moves beyond of the context of if it can benefit them. In other words, you use assets for as long as you can extract value from them.
That’s just good business.
What’s the objective of this project?
The primary objective is to mitigate risk – the risk that a critical hardware failure will occur that takes production off-line for an indeterminate amount of time. Secondary objectives all include modernizing the solution, improving disaster recovery capabilities, eliminating proprietary or unsupported code, and cleaning up any hidden messes that might have collected over the years.
Put differently, the question really is – can we virtualize it and buy some more time, or do we need to re-engineer the solution?
Starting with a quick overview of the project in question… The CLI looks vaguely familiar, but requires a bit of translation (or a VAX/VMS resource) to interact with it. Starting Lsnrctl returns an Oracle database version… which, unfortunately several searches return precisely zero results for. Un/der-documented versions of Oracle are always a favorite. Backups to tape are reportedly functioning, and there’s also a Windows reporting client GUI (binary only, of course), from a long-defunct vendor. The good news this time around… the platform is apparently functional and in a relatively “good” working state. The bad news… there is no support contract for anything. Not for the hardware, not for Oracle, and certainly not from the Windows reporting client. In this case, the legacy VAX is basically a magical black-box that just runs and gives the customer the data they need. And at this point, all institutional knowledge beyond running very specific commend sets has been lost – which isn’t atypical for 20-30 year old platforms.
Which bring us to the question – virtualize, or re-engineer?
Virtualizing a VAX
To start with, most VAX/VMS operating systems are designed for specific CPU types, so virtualizing directly using something like VMware, or Hyper-V is a non-starter. But those CPU architectures and configurations are pretty old now. Like, 20-30 years old. That makes them candidates for brute force emulation. And there are a few choices of emulator out there… including open-source options like SIMH, and TS10, as well as commercial solutions like NuVAX, and Charon. After doing a bit of research, it’s pretty clear that there was only one leading commercial offering for my use case… Charon from a company called Stomasys. While there may be merit in exploring open-source alternatives further, the reality is that the open-source community for VAX system development isn’t exactly active in the same sense the Linux OS community is active. So if you do go down the open-source path, keep in mind that some of the solutions aren’t even going to be able to do what you might think of as simple and obvious things… like, say, boot OpenVMS. Which is pretty limiting.
Charon Overview
Aside from the Greek mythology reference to the ferryman who transported the dead across the river Styx, Charon is also a brand name for a group of products (CHARON-AXP, CHARON-VAX) that emulate several CPU architectures, covering most of the common DEC platforms. You know… things like OpenVMS , VAX, AlphaServer, MicroVAX3100, and other legacy operating systems. Why the name Charon? Like the mythological boatman of who, for a price, keeps the dead from being trapped on the wrong side of the river (e.g. old failing hardware); Charon transports the legacy platform unchanged between the two worlds (legacy and modern). In a similar manner that running a P2V conversion on say, Windows NT, let’s you run a 20 year old Windows assets under vSphere ESXi, Charon lets you run your legacy VAX workloads unchanged on modern hardware. In other words, you can kind of think of Charon like a P2V platform for your legacy VAX/VMS systems. Of course, that’s a wildly inaccurate way to think about it, but that’s basically the result you effectively get.
How does Charon Work?
Charon is emulator … it’s secret sauce is that it does the hard work of converting instructions written for a legacy hardware architecture, so that you can run them on an x86/x64 CPU architecture, and do so quickly and reliably. Because Charon enables you to run your environment unchanged on the new hardware, not only to you get to avoid the costly effort of reengineering your solution, but you can also usually avoid the painful effort of reinstalling your applications, databases, etc. So beneath the hood, what Charon is essentially doing is creating a new hardware abstraction layer (HAL), to sit on top of your x86/x64 compatible physical or virtual hardware. The Charon emulator creates a model of the DEC/HP Alpha hardware and I/IO devices. Once you have the Charon emulator installed, you have an exact working model on which you can install your DEC/HP/VMS operating system, and applications. Charon systems then execute the same binary code that the old physical hardware did. Here’s what the whole solution stack looks like mashed together:
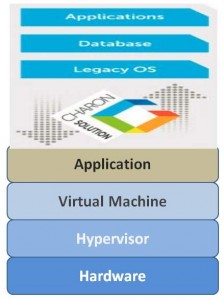
Yes, lots of layers. But even still, because of the difference between the legacy platform and the modern platform, you still typically get a performance boost in the process.
What do I need?
Assuming you have a running legacy asset that’s compatible with Charon, all you need is a destination server. In my case, the customer had an existing vSphere environment, and existing backup/recovery capabilities, so all that was really needed was an ESXi host to run a new VM on, and the licensing for Charon.
The process at 30,000 feet looks like this:
- Add a new vSphere (5.5x) host
- Deploy a Windows 2008 R2 VM (or Linux) template
- Use image backups to move your system to the VM
- Restore databases from backup.
- Telnet into your Charon instance
At a high-level, it really is that simple.
How challenging is the installation?
If you skim the documentation before installing, it shouldn’t be an issue. Assuming you have access to the legacy host, you can get an inventory of the information about the legacy platform in order to get the right Charon license… you basically need to grab a list of things like CPU architecture, OS version, tape drive type, etc. (e.g. SHO SYS, SHO DEV, SHO LIC,, SHO MEM, SHO CLU, etc.), which will enable you to get the right Charon licenses. After that, you’ll be ready to step through the installation. This isn’t a next/next/finish setup, but once you’ve added got the USB dongle setup, and create a VM based on the recommended hardware specifications, you’re well on your way.
Restoring the data from the legacy hardware onto the new VM, can be a bit more involved. In a perfect world, you’d be able to restore directly from tape into the new Windows VM – assuming you have the right tape drive, good backups to tape, etc. Short of that, you’ll need to backup and restore the legacy drives into the new environment. So you’re going to take image backups of each drive, and then upload the backups to your new VM. More specifically, do a backup from drive A0 to A1, then A1 to A2, etc. Upload the A0 backup to your new VM and restore the data. Proceed like that until you’ve completed the all of the restores. In this manner, you’ll be able preserve your operating system, database installation, and any other applications, without going through the time consuming installation and configuration process. As a result, you avoid troublesome things like version mismatches, etc., missing media, poor documentation, etc. After the backups are restored, Charon is able to take those restored files that exist on the parent VM, and boot those as local storage – and you’re off and running.
What does Charon look like?
After you’ve installed Charon, the management interface is accessible via the system tray.
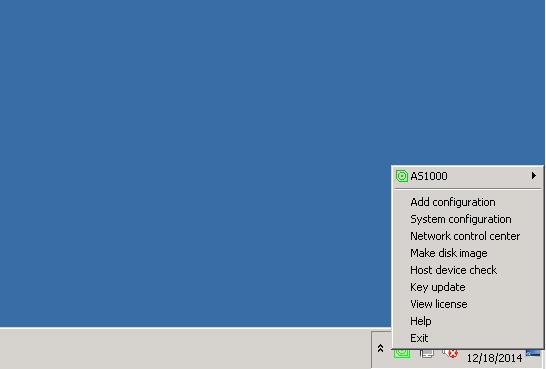
If you’re thinking that’s pretty bare-bones, then you’re right. Once you’ve installed and configured Charon, there’s just not a lot to do from the management interface.
How do I login to the console?
In order to access the legacy OS console and CLI, you’ll simply fire-up your favorite telnet client and point it at the IP address of your Charon system.
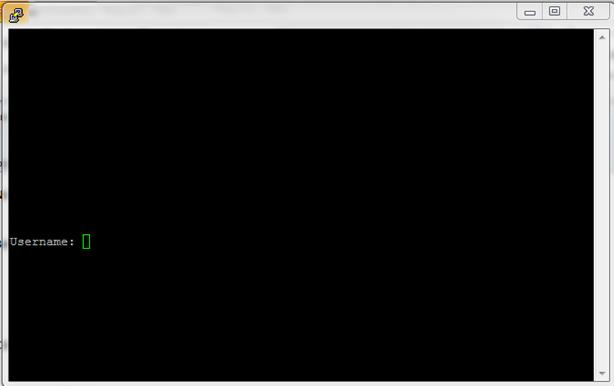
Which should resemble the old physical console.
Issues Encountered
While the 30,000 foot process that was outlined early in the article is essentially what was followed, the biggest problem that was ran into is probably exactly what you’d guess it to be. The Oracle database. Unsupported, and underdocumented as it was, we ran into several problems restoring successfully from tape. While not a problem with Charon,the reality is that very old and unsupported platforms can have problems that go undetected for years. Whiel this was resolved within the planned budget, it was still inconvenient. And should serve as a reminder, that to the extent it’s possible to have a support contract in-place for critical components, you should. At the same time, that’s not always the boots-on-the-ground situation.
The verdict?
We successfully mitigated the hardware risk associated with the failing hardware in the environment, which was our primary objective. Using Charon, we were able to pull-forward the legacy environment , running it on new supported hardware. Between re-installing the legacy OS under Charon, and restoring our application data and backups via tape, we were able to also meet some of the secondary objectives. As a Windows 2008 R2 VM running on a dedicated vSphere host in the customer’s datacenter, we have something modernized (at least to some extent), and that plugs-into the existing backup infrastructure. With Veeam Backup and Replication, and a standard backup policy with standard RPO, and RTO objectives we have something that the client has a high-degree of confidence in.