
If you didn’t register a domain name when you selected a hosting provider, then you probably did in the Domain Registration portion of this series. After registering your domain, the next step is to get DNS (Domain Name System) configured so that when you type www.yourdomainname.com, your web-host responds and presents a web-page.
What is DNS?
At 30,000 feet, DNS is a hierarchical distributed naming system for resources. It translates domain names (e.g. mydomain.com) into IP addresses (111.222.111.222) on the internet. For the purposes of this article, we’re only really concerned about getting your domain name to point at your web-host. And fortunately, that’s pretty easy.
What’s an IP address?
An IP address is a unique identifier that matches to your domain name. IP addresses must be unique on the Internet (e.g. there’s only one 111.222.111.222). Using a DNS configuration tool, we map that IP address to a domain name. Just because you registered your domain name with, say, GoDaddy… doesn’t mean that your DNS has to point to GoDaddy’s web-servers. For example, if you registered your domain via GoDaddy, but you’re hosting your web-site on DigitalOcean, you can point your name servers at DigitalOcean. (e.g. n1.digitalocean.com, ns2.digitalocean.com, ns3.digitalocean.com). In other words, if you login to GoDaddy, and go to Domain Management, you’ll be able to Manage the nameservers. In the above example, if ns1/ns2/ns3.digitalocean.com are listed in GoDaddy’s Domain Management page, that’s all you really need to do (assuming your site is up and configured at digitalocean). What you’re doing by configuring the name servers there, is telling DNS that DigitalOcean is authoritative for your domain. Once you do that, all that GoDaddy is doing for you is pointing at the third-party DNS host. So, if you want to make changes to DNS (e.g. create subdomains, configure a mail server, setup some types of CDNs, etc.), then you need to do it through DNS management console of your DNS host. In this example, if you login to DigitalOcean, here’s what the DNS Management Console looks like: 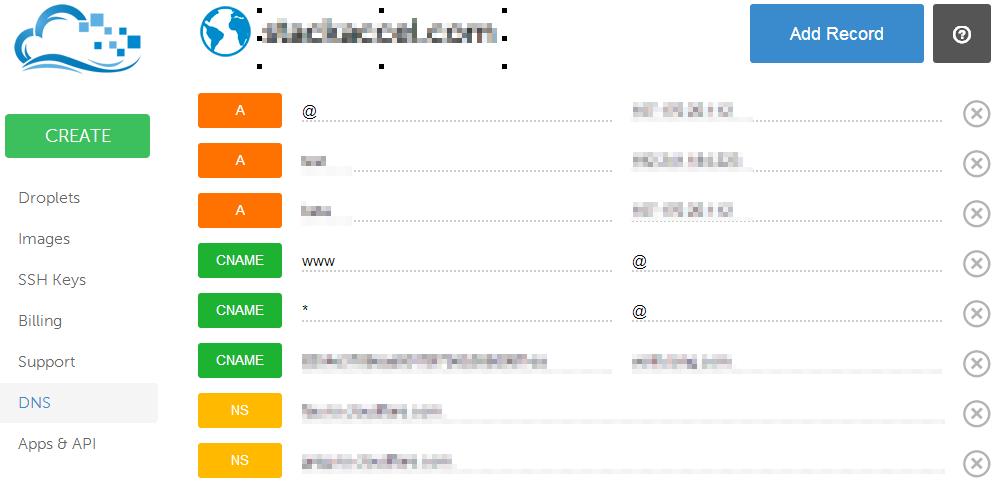 What’s all of this stuff?
There are several different types of records, including A, CNAME, MX, SRV, and NS records. If you’ve already configured your nameservers to point at DigitalOcean, then any changes you make here will be translate into behavior changes when folks type your web-address. So, if your WordPress host is running on DigitalOcean, then all you need to do is create an A-record at point it at the IP address of your digitalocean WordPress server.
Where is my IP Address on DigitalOcean? You can find the IP address of your DigitalOcean WordPress server by clicking on “Droplets”, and matching the IP address of your WordPress server (e.g. in our example, we’ll use 111.222.111.222). 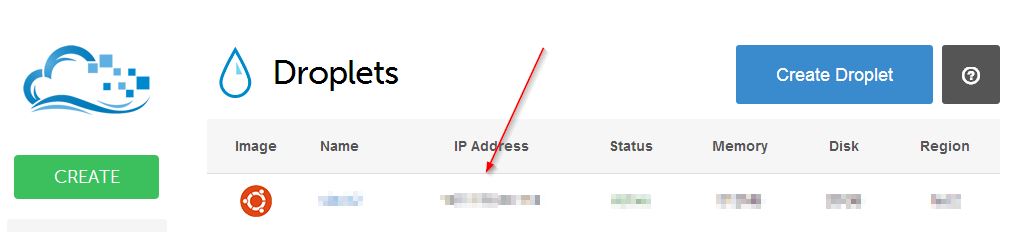 A-Records After you have that, click on the DNS in the left hand navigation column and create a new A-record. In most cases, you’ll want to create a new A-record for “www”, and match it with your IP address. Alternatively, you could use “@” matched with your IP address. Using the “@” symbol, is a reference to the root domain itself. So in practice, here’s what this means…you probably want folks to reach your web-site by going to https://www.domain.com – so create an A-Record to point from www.domain.com to your IP address. You probably also want folks who just type http://domain.com to reach your domain name, so create a second A-Record pointing “@” to your IP address. That way, folks typing www.domain.com, or just domain.com will be directed to your IP address.
CNAME Records
A CNAME record works as an alias of the A record. That way, if an A Record’s IP address changes, the CNAME will follow to the new address automatically. You might want to go ahead an create a CNAME record to point www to the root domain via “@”. And then you can also use a wildcard to direct any mistyped records (e.g. wwq.domain.com) to domain.com by pointing an “*” to the root domain “@”.
MX Records
An MX (mail exchanger ) record is a type of resource record for record that specifies the mail server responsible for accepting email messages on behalf of a recipient’s domain, and a preference value used to prioritize servers. While beyond the scope of this article, the lower preference value (e.g. the lower number), the higher delivery preference, meaning that sending mail servers will look first to the highest priority to deliver (e.g. lowest number). You can assign multiple records the same priority level to provide a type of load-balancing, or you can assign backup servers based if you have design considerations where the backup server is limited in some manner (e.g. high-latency internet connection, etc.).
0 comments… add one